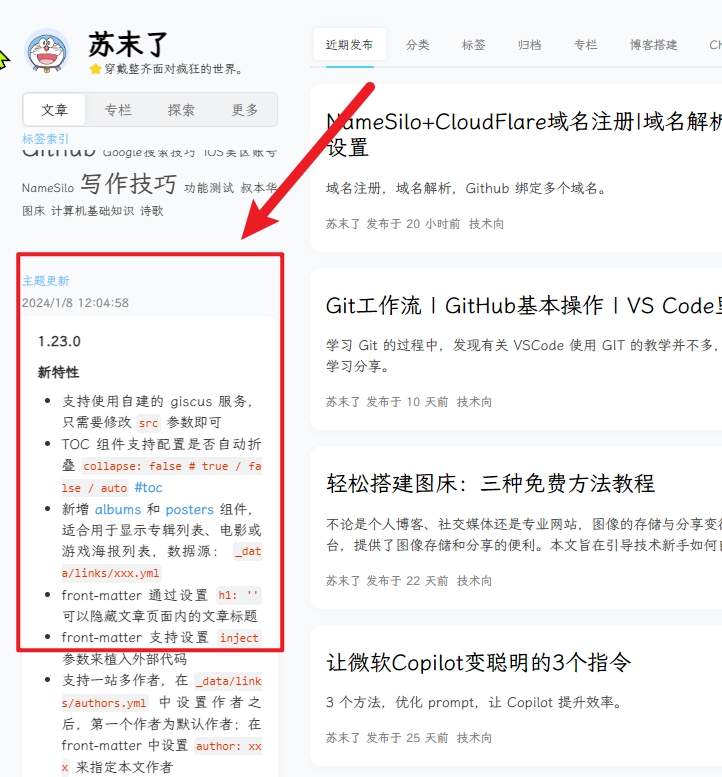
Stellar 主题全面的配置文档可参考源码作者:Xaoxuu .
修改站点信息 Stellar 会读取站点根目录\_config.yml 文件中的信息来生成网站,直接修改即可:
_config.yml 1 2 3 4 5 6 7 8 title : 您的网站名称avatar : 您的头像链接favicon : 您的网站iconsubtitle : 您的网站副标题language :CN
创建主题配置文件
在博客根目录的 _config.yml 文件同目录中新建一个文件: _config.stellar.yml ;在这个文件中的配置信息优先级高于主题文件夹中的配置文件。
字体设置
第一步:_config.yml 文件中,最后一行加入以下指令:
_config.yml 1 2 3 4 5 6 7 inject : head : -(<link rel ="stylesheet" href ="https://cdn.staticfile.org/lxgw-wenkai-screen-webfont/1.6.0/lxgwwenkaiscreen.css" media ="all" />
第二步:在_config.stellar.yml 中找到 style.font-family,修改以下内容:
_config.stellar.yml 1 2 3 4 style :family :logo : '"LXGW WenKai Screen", ... body: ' "LXGW WenKai Screen" , ...
添加运行时间
第一步:_config.stellar.yml 文件下,找到 footer , 在 content: 之后添加代码。
第二步:修改 X 部分的时间,改成自己网站成立的年月日即可。
_config.stellar.yml 1 2 3 4 5 6 7 8 9 10 11 12 13 14 15 16 17 18 19 20 21 22 23 24 content : | # 支持 Markdown 格式<script type ="text/javascript" > function show_runtime ( window .setTimeout ("show_runtime()" , 1000 ); X = new Date ("10/20/2023 00:00:00 " ); Y = new Date (); T = (Y.getTime () - X.getTime ()); M = 24 * 60 * 60 * 1000 ; a = T / M; A = Math .floor (a); b = (a - A) * 24 ; B = Math .floor (b); c = (b - B) * 60 ; C = Math .floor ((b - B) * 60 ); D = Math .floor ((c - C) * 60 ); runtime_span.innerHTML = "⏲️ 本站已运行 " + A + "天|" + B + "小时|" + C + "分|" + D + "秒 ⏲️" } show_runtime (); </script > <span id ="runtime_span" > </span >
代码块复制 在_config.stellar.yml 修改:
_config.stellar.yml 1 2 3 4 5 copycode :enable : true js : /js/ plugins/copycode.js default_text : 'Copy' # 按钮显示文字success_text : 'Copied' # 复制成功信息
添加背景动态线条效果 在 layout.ejs 的<body>里添加代码:
/theme/stellar/layout.ejs 1 2 3 4 <!--动态线条背景-->"text/javascript" "220,220,220" opacity ='0.7' zIndex = "-2" count = "200" src = "//cdn.bootcss.com/canvas-nest.js/1.0.0/canvas-nest.min.js" >
color:线条颜色,三个数字分别为(R, G, B),默认:(0,0,0);opacity:线条透明度(0~1),默认:0.5;count:表示线条的总数量,默认:150;zIndex:表示背景的 z-index 属性,css 属性用于控制所在层的位置,默认:-1;
主题版本更新 方法一:稳定版
在 package.json 中修改 stellar 的版本号,然后执行:
阅读 更新日志 选择合适版本进行迁移。
方法二:最新版
进入/blog/themes/文件,启动 git bash, 执行命令。下载最新版的主题,删除旧版本
进入主题文件/themes/stellar/, 启动 git bash,执行命令。
文章页顶部导航栏
修改配置文件_config.stellar.yml,添加标题和文件链接:
_config.stellar.yml 1 2 3 4 5 6 7 8 9 10 index : # 近期发布 分类 标签 归档 and ..."专栏" : /wiki/ "博客搭建" : /wiki/ Hexo /xx.html index_blog :nav_tabs : # 近期发布 分类 标签 专栏 归档 and ..."留言" : /about/ #comments #点击到网页复制路径
侧边栏欢迎语
侧边栏支持使用 markdown 语法,markdown 支持 HTML 语言,可以通过 HTML 自定义各种样式的侧边栏.
在主题文件目录下的_data/widgets.yml 文件中新增一项侧边栏配置,写下你的网站欢迎语.
可以引用开放接口,如【今日诗词】.
_data/widgets.yml 1 2 3 4 5 6 7 8 welcome :layout : markdowntitle : '🎉 欢迎 ' content : |Github , 可能会出现加载缓慢或丢失问题,欢迎在评论区交流技术知识。<span id ="jinrishici-sentence" > </span > <script src ="https://sdk.jinrishici.com/v2/browser/jinrishici.js" charset ="utf-8" > </script >
修改主题配置_config.stellar.yml,设置欢迎语出现的具体位置
_config.stellar.yml 1 2 3 4 widgets :home : search, welcome, recent, tagcloud, timeline # for home
侧边栏免责声明 主题文件目录下的_data/wodgets.yml 文件中新增一项侧边栏配置,使用 markdown 布局
_data/wodgets.yml 1 2 3 4 5 6 7 8 9 10 11 12 statement :layout : markdowntitle : '<br>' content : |<center > <h4 id ="免责声明" > 免责声明 </h4 > <p > 本站提供的一切软件、教程和内容信息仅限用于学习和研究目的。</p > <p > 不得将上述内容用于商业或非法用途,否则一切后果自负。</p > <p > 本站信息来自网络收集整理,版权争议与本站无关。</p > <p > 如果有侵权之处请第一时间联系站长删除。敬请谅解! </p > </center >
永久链接插件 永久链接指用一串随机字符替代文章名作为网页访问链接,这样即使修改文章名称也不会改变文章访问链接,有助于网站 SEO 优化
在项目根路径下安装永久链接插件
修改_config.yml中的配置,启用永久链接
_config.yml 1 permalink : posts/: abbrlink.html
配置文件底部添加如下配置,可以实现更优算法生成永久链接
_config.yml 1 2 3 4 5 6 7 8 9 10 11 12 13 14 # abbrlink 配置abbrlink :alg : crc32 #算法,支持 crc16 (default )和 crc32rep : hex #进制,支持 dec (default )和 hexdrafts : false #true :对草稿也进行处理,false :不处理草稿。默认为 false depth : 您想生成的目录树的最大深度, 需要大于 0 auto_category :enable : true #默认为 true depth : #默认为 3 over_write : false auto_title : false #启用自动标题,它可以按路径自动填充标题auto_date : false #启用自动日期,可以按今天的时间自动填写日期force : false #启用 Force 模式,在这种模式下插件将忽略缓存,并为每一篇文章计算生成永久链接,即使它已经有了永久链接。这个设置只会更新永久链接,而不是更新其他前置变量。
在生成静态页面时,插件会自动在 Markdown 文件头部生成永久链接参数
1 2 3 4 --- title: Hello World abbrlink: 4a17b156 ---
重新生成网页发布后,网页访问链接就变成了 ../posts/4a17b156.html 的格式。
创建自定义 CSS
source目录下新建文件夹css,在 CSS 目录下新建我们自定义文件 my.css
博客配置文件_config.yml中引入 CSS 文件,CSS 文件一般在head引入,JS 文件一般在script里引入
_config.yml 1 2 3 4 5 6 7 8 9 inject :head :"?任意内容" ,可以在每次更新之后用户自动重新请求,避免用户使用本地缓存<link rel ="stylesheet" href ="/css/my.css?1" > script: # 自定义 js - <script type ="text/javascript" src ="/js/script.js?1" > </script > - <script src ="/js/script.js?1" > </script >
添加评论功能 目前 Staller 主题集成多种评论功能插件,包括 beaudar、utterances、giscus、twikoo、waline、artalk。今日来探讨 twikoo.
配置 twikoo 云函数,参考如下链接。
在博客配置文件_config.stellar.yml中启用 twikoo 评论
_config.stellar.yml 1 2 3 4 5 6 7 8 9 ######## Comments ########comments :service : twikooTwikoo https :twikoo :js : https :envId : https :
评论功能目前已配置成功。如果需要在 page 或 post 文件头部显示,可以添加comments字段指定该页面启用评论。
在 twikoo 管理面板中通过DEFAULT_GRAVATAR参数可以设置评论默认使用的头像类型,具体有如下几类:
给评论添加输入提示框,在我们前面创建的自定义 CSS 文件中插入如下代码:
1 2 3 4 5 6 7 8 9 10 11 12 13 14 15 16 17 18 19 20 21 22 23 24 25 26 27 28 29 30 31 32 33 34 35 36 37 38 39 40 41 42 43 44 45 46 47 48 49 50 51 52 53 54 55 56 57 58 59 .el-input .el-input--small .el-input-group .el-input-group--prepend : nth-child (1 ): before {content : '输入 QQ 号会自动获取昵称和头像 🐧' ;.el-input .el-input--small .el-input-group .el-input-group--prepend : nth-child (2 ): before {content : '收到回复将会发送到您的邮箱 📧' ;.el-input .el-input--small .el-input-group .el-input-group--prepend : nth-child (3 ): before {content : '可以通过昵称访问您的网站 🔗' ;.el-input .el-input--small .el-input-group .el-input-group--prepend :focus-within :: before,.el-input .el-input--small .el-input-group .el-input-group--prepend :focus-within :: after {display : block;.el-input .el-input--small .el-input-group .el-input-group--prepend :: before {display : none;position : absolute;top : -60px ;white-space : nowrap;border-radius : 10px ;left : 50% ;transform : translate (-50% );padding : 14px 18px ;background : #444 ;color : #fff ;.el-input .el-input--small .el-input-group .el-input-group--prepend :: after {display : none;content : '' ;position : absolute;border : 12px solid transparent;border-top-color : #444 ;left : 50% ;transform : translate (-50% , -48px );.tk-nick .tk-nick-link {color : #f56c6c ! important;
项目标签彩色更改 进入_config.stellar.yml 文件,更改 article 中的 category 标签:
_config.stellar.yml 1 2 3 4 5 6 7 8 9 article :category_color :"探索号" : "#4CB9E7" "博客搭建" : "#4CB9E7" "Hexo" : "#FF004D" "ChatGPT" : "#43766C" "绘画" : "#11009E" "前端" : "#F08A5D"
侧边栏时间线新增 假设我们需要在主页和专栏的文章内页侧边栏处,分别新增主题更新进度的时间线,需要三步。
在/source/data/widgets.yml中新增主题进度时间线标签
将新增的时间线标签,填写于/source/wiki/项目名.yml的配置中
将新增的时间线标签,填写至_config.stellar.yml的配置中
/source/data/widgets.yml 1 2 3 4 5 release_update :layout : timelinetitle : 主题更新api : https :user : xaoxuu
/source/wiki/项目名.yml 1 2 3 4 widgets :home : search, welcome-other, recent, tagcloud, release_update
_config.stellar.yml 1 sidebar : -search - toc - release_update;
新增 memos 说说功能 想要实现 memos 功能,首先需要注册一个账号。注册账号可以使用别人已经搭建好的 memos,也可以自行搭建 memos(需要有服务器,我就不折腾了)。这里直接采用的杜老师 的 memos。
点击进入[dusys.com[(https://dusays.com/561/ ) 查看教程,注册一个自己的账号。
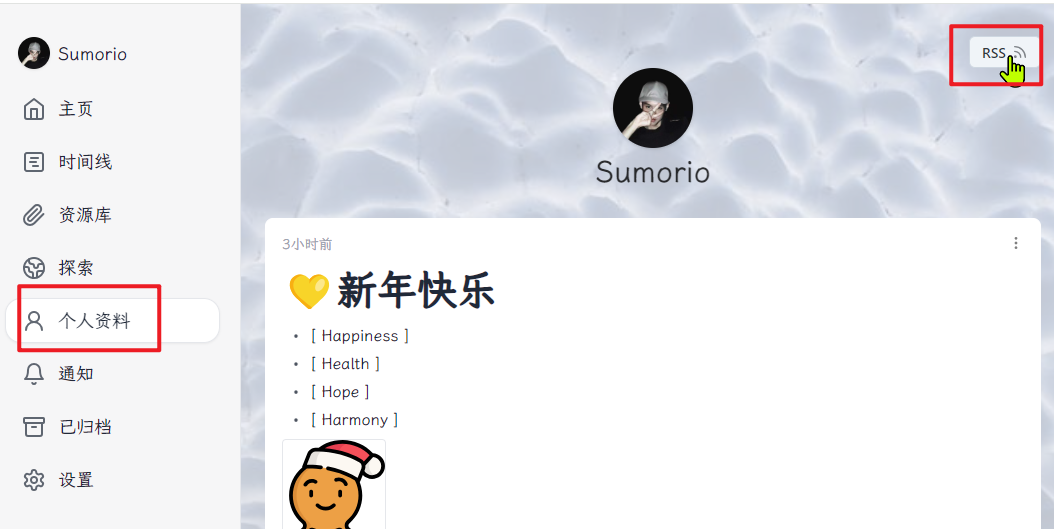
登录账号,个人资料点击 RSS,s.dusays.com ,网址中U后面的数字就是自己的ID。
如果需要在 hexo-stellar 的侧边栏 sidebar 中展示 memos,首先在/source/_data/widgets.yml 中新增一条记录,然后在相应页面的 sidebar 部分新增配置。
/source/_data/widgets.yml 1 2 3 4 5 6 memos-du :layout : timelinetitle : 说说api : https :type : memoshide : user, footer
如果需要在 hexo-stellar 的文章正文展示 memos,在正文任意位置新增以下代码。
***.md 1 2 {% timeline api :https :
修改 “开始使用” 按钮颜色 找到themes/stellar/css/common/button.styl 文件。修改其中的a.button.start的backgroud颜色。
二级标题去除“:” md.styl文件中,配置h2 a.headerlink:before content: ''
随机文章跳转
创建 themes/stellar/scripts/helpers/random.js ,增加以下代码:
themes/stellar/scripts/helpers/random.js 1 2 3 4 5 6 7 8 9 hexo.extend .filter .register ('after_render: html' , function (data ) {const posts = []locals .get ('posts' ).map (function (post ) {if (post.random !== false ) posts.push (post.path )`<script>var posts=${JSON .stringify(posts)} ;function toRandomPost(){ window.pjax ? pjax.loadUrl('/'+posts[Math.floor(Math.random()*posts.length)]) : window.open('/'+posts[Math.floor(Math.random()*posts.length)], "_self"); };</script>` return data
_config.yml文件中引入 js文件 ,增加以下代码:
_config.yml 1 - <script src ="/js/" > </script >
需要时调用,2种执行方法,均toRandomPost () 函数。
1 2 3 4 5 #使用按钮实现跳转: button onclick ="toRandomPost()" > 随机阅读一篇文章 </button >#使用链接实现跳转: "#" onclick ="toRandomPost(); return false;" > 随机阅读一篇文章 </a>
字数统计:“发表了x篇文章,共计x字”
安装 hexo-wordcount 插件:
在 themes/stellar/layout/_partial/main/footer.ejs 中,找到以下部分:
themes/stellar/layout/_partial/main/footer.ejs 1 2 3 4 5 '<div class="text">' if (content) {markdown (content)
在以上代码后面添加以下代码:
1 el += '<span class ="totalcount" > 发表了 ' + site.posts.length + ' 篇文章 · </span > <span class ="post-count" > 总计 ' + totalcount(site) + ' 字 </span > '
最后代码:
1 2 3 4 5 6 7 8 9 10 11 12 13 ...'<div class=" text">' if (content) {'<span class=" totalcount"> 发表了 ' + site.posts.length + ' 篇文章 · </span> <span class=" post-count"> 总计 ' + totalcount(site) + ' 字 </span>' '</div> </footer>' return el
在自定义 css 里,增加以下代码修改风格:
1 2 3 4 5 6 7 8 .post-count {scrollbar-width : none;color : var (--text-p4);.totalcount {color : var (--text-p4);
文章卡新增字数统计
找到 \themes\stellar\layout\_partial\main\post_list\post_card.ejs 文件
找到 //meta 处,代码修改后如下:
themes\stellar\layout\_partial\main\post_list\post_card.ejs 1 2 3 4 5 6 7 8 9 '<div class="meta cap">' ;'<span class="cap" id="post-meta">' ;icon ('default: calendar' )`<time datetime="${date_xml(post.date)} ">${date(post.date, config.date_format)} </time>` '<span class="post-count"> ' + wordcount (post.content ) +' 字 </span>' ;'</span>' ;
Hexo-Stellar+Twikoo评论展示在侧边栏
新建 twikoo_new.js ,在 theme/source/js/services/ 下
/_twikoo_new.js 1 2 3 4 5 6 7 8 9 10 11 12 13 14 15 16 17 18 19 20 21 22 23 24 25 26 27 28 29 30 31 32 33 34 35 36 37 38 39 40 41 42 43 44 utils.jq (() => {const el = document .querySelector ('.ds-twikoo' );onLoading (el); const api = el.getAttribute ('api' );const limit = parseInt (el.getAttribute ('limit' )) || 10 ;const reply = el.getAttribute ('hide' ) !== 'reply' ;if (! api) return ;fetch (api, {method : "POST" ,body : JSON .stringify ({"event" : "GET_RECENT_COMMENTS" ,"envId" : api,"pageSize" : limit,"includeReply" : replyheaders : { 'Content-Type' : 'application/json' }then (res =>json ())then (({ data } ) => {onLoadSuccess (el); forEach ((comment, j ) => {let commentText = comment.commentText ;if (! commentText || commentText.trim () === '' ) return ; replace (/&/g , "&" ).replace (/</g , "<" ).replace (/>/g , ">" ).replace (/"/g , "" " ).replace (/'/g , "'" );length > 50 ? commentText.substring (0 , 50 ) + '...' : commentText;var cell = '<div class="timenode" index="' + j + '">' ;'<div class="header">' ;'<div class="user-info">' ;'<span>' + comment.nick + '</span>' ;'</div>' ;'<span>' + new Date (comment.created ).toLocaleString ('zh-CN' , {month : '2-digit' , day : '2-digit' , hour : '2-digit' , minute : '2-digit' , hour12 : false }) + '</span>' ;'</div>' ;'<a class="body" href="' + comment.url + '#' + comment.id + '">' ;'</a>' ;'</div>' ;append (cell);catch (() => utils.onLoadFailure (el));
_config.stellar.yml主题配置文件的 data_services 下引入脚本:
_config.stellar.yml 1 2 3 4 data_services :twikoo :js : /js/ services/twikoo_new.js
在 _data/widgets.yml 中创建小组件,使用:
_data/widgets.yml 1 2 3 4 5 6 7 new_comment :layout : timelinetitle : 最新评论api : https :type : twikoolimit : 16 # 限制获取数量,默认为 10 hide : reply # 是否隐藏回复,不填默认不隐藏
随机跳转文章
在themes/stellar/scripts/helpers/random.js创建文件。
themes/stellar/scripts/helpers/random.js 1 2 3 4 5 6 7 8 hexo.extend .filter .register ('after_render: html' , function (data ) {const posts = []locals .get ('posts' ).map (function (post ) {if (post.random !== false ) posts.push (post.path )`<script>var posts=${JSON .stringify(posts)} ;function toRandomPost(){ window.pjax ? pjax.loadUrl('/'+posts[Math.floor(Math.random()*posts.length)]) : window.open('/'+posts[Math.floor(Math.random()*posts.length)], "_self"); };</script>` return data
在主题配置文件 _config.stellar.yml的inject中添加代码引入:
_config.stellar.yml 1 2 3 4 inject :head :script :<script src ="/js/random.js" > </script >
在需要调用的位置执行 toRandomPost () 函数即可。示例2种方式:
添加按钮并随机跳转:<button onclick="toRandomPost()">随机阅读一篇文章</button>
添加链接并随机跳转:<a href="#" onclick="toRandomPost(); return false;">随机阅读一篇文章</a>
也可以widgets.yml中调用:
/source/_data/widgets.yml 1 2 3 4 5 6 7 8 9 10 11 welcome-info :layout : markdowntitle : 'hello!' linklist :columns : 1 items :icon : 图片链接title : 随机文章url : 'javascript: toRandomPost()' content : |<span id ="welcome-info" style ="font-family: LXGW WenKai Screen;" > </span >
页面底部字数统计
安装 hexo-wordcount 插件:npm i hexo-wordcount --save
themes/stellar/layout/_partial/main/footer.ejs 文件中,找到//footer:
themes/stellar/layout/_partial/main/footer.ejs 1 2 3 4 5 '<div class="text">' if (content) {markdown (content)
在这一段代码后加上如下:
themes/stellar/layout/_partial/main/footer.ejs 1 2 3 '<span class="totalcount"> 共发表 ' + site.posts .length + ' 篇 Blog · </span> <span class="post-count"> 总计 ' + totalcount (site) + ' 字 </span>'
新建自定义css,可以放在/hexo/source/custom/css/self.css,加入css代码:
1 2 3 4 5 6 7 8 9 10 11 12 13 14 .post-count {scrollbar-width : none;color : var (--text-p4);.totalcount {color : var (--text-p4);.page-footer {text-align : center; margin : 0 auto; width : 100% ;
在主题文件_config.yml中引入css文件,才能生效:
1 2 3 inject:rel ="stylesheet" href ="/custom/css/self.css" >
教程来源:宇宙尽头的餐馆
文章面包屑显示字数|阅读时长|标签
找到themes\stellar\layout\_partial\main\footer.ejs文件的// 3.left.bottom处,新增代码:
themes\stellar\layout\_partial\main\footer.ejs 1 2 3 4 5 6 7 8 9 10 11 12 13 14 15 16 partial ('dateinfo' )'<div class="flex-row" id="page-words"> <span style="padding: 4px;"> 本文:' + wordcount (page.content ) + '字 </span> <span class="sep updated" style="padding: 4px;"> </span> <span class="text updated" style="padding: 4px;"> 阅读时长:' + min2read (page.content ) + '分 </span> </div>' ;if (page.layout == "post" && page.tags && page.tags .length > 0 ) {'<div class="flex-row" id="tag">' ; ' <span>  标签:</span>' ;list_categories (page.tags , {class : "cap breadcrumb" ,show_count : false ,separator : ' ' ,style : "none" '  </div>' ;
2.在自定义css中新增代码,/hexo/source/custom/css/self.css,加入css代码:
/hexo/source/custom/css/self.css 1 2 3 4 5 6 7 8 9 10 .bread -nav div#page-words span.sep : before {content : '|' ;bread -nav div#page-words span.updated {visibility : hidden;bread -nav : hover div#page-words span.updated {visibility : visible;
教程来源:Thun888
fontawesome 动态图标 在配置文件中引入新增的CSS:
_config.yml 1 2 3 4 inject :head :<link rel ="stylesheet" href ="https://cdnjs.cloudflare.com/ajax/libs/font-awesome/6.4.2/css/all.min.css" >
引入后就可以使用动态图标了,类似左下角的图标跳动部分。
比如,在组件中加入动态图标:
\blog\source\_data\widgets.yml 1 2 3 4 5 6 7 "朋友圈" :layout : timelinetitle : '<i class="fa-solid fa-snowflake fa-spin" style="color: #08D9D6;"> </i> 朋友文章' api : https :api : https :type : fcirclelimit : 5 # 可通过这个限制最大数量
jsDelivr 加速 GitHub 文件访问 使用jsdelivr转换工具 ,将 Github 链接转 Jsdelivr,将原链接替换为转化后的链接,实现国内访问加速。
捐赠码功能 博主建站、申请域名、网站维护都需要耗费很大精力,赏个鸡腿全速起飞。
找到代码倒数第五行,将下面代码放置在 el += '</div>';上一行:
\themes\stellar\layout\_partial\main\article\article_footer.ejs 1 2 3 4 5 6 7 8 9 10 11 12 13 14 15 16 17 18 19 20 21 22 23 24 25 26 27 28 29 30 31 32 33 34 35 36 37 38 39 40 41 42 43 44 45 46 47 48 49 50 if (theme.article .donate ) {const donateImage = (if (theme.article .donate .wechat ) {return ` <div class="donate-image" id="donate-wechat" style="display:none; position:absolute; z-index:1000; transform: translateY(-100%); left: 50%; transform: translateX(-50%) translateY(-100%);"> <img src="${theme.article.donate.wechat} " alt="Donate with WeChat" style="width: 150px; height: auto;" /> </div> ` ;else {return '' ;` <section id="donate"> <div class="header"><span>${__('meta.donate' )} </span></div> <div class="body"> <p>${__('点击爱心给作者加鸡腿~ ' )} <span class="donate-icon" onclick="showQRCode()" style="display: inline-block;"> <i class="fas fa-heart fa-flip" style="font-size: 20px; color:#fe8f8f;"></i> </span> </p> ${donateImage()} </div> </section> ` ;` <script> const showQRCode = () => { const qrCode = document.getElementById('donate-wechat'); qrCode.style.display = 'block'; document.addEventListener('click', hideQRCode); }; const hideQRCode = (event) => { const qrCode = document.getElementById('donate-wechat'); const donateIcon = document.querySelector('.donate-icon'); if (!qrCode.contains(event.target) && !donateIcon.contains(event.target)) { qrCode.style.display = 'none'; document.removeEventListener('click', hideQRCode); } }; </script> ` ;'</div>' ;return el;
在_config.stellar.yml中新增donate板块。
_config.stellar.yml 1 2 3 4 ######## Article ########article :donate :wechat : '收款二维码图片地址'
在\themes\stellar\languages\zh-CN.yml文件中新增该板块显示的名称,可任意取名。
\themes\stellar\languages\zh-CN.yml friends友链卡片样式微调 /themes/stellar/source/css/_components/tag-plugins/friends.styl 1 2 3 4 5 6 7 8 9 .users-wrap .user-card .card-link img transform : scale (1.5 ) rotate (360deg ) .users-wrap .user-card img border-radius : 8px


